The Easiest Bathroom Upgrade You Haven’t Made Yet
Bidet toilet seat installation is simpler than most Florida homeowners expect. No major plumbing work. No contractor required. For most standard toilets, the whole job takes under 30 minutes with basic tools you likely already own.
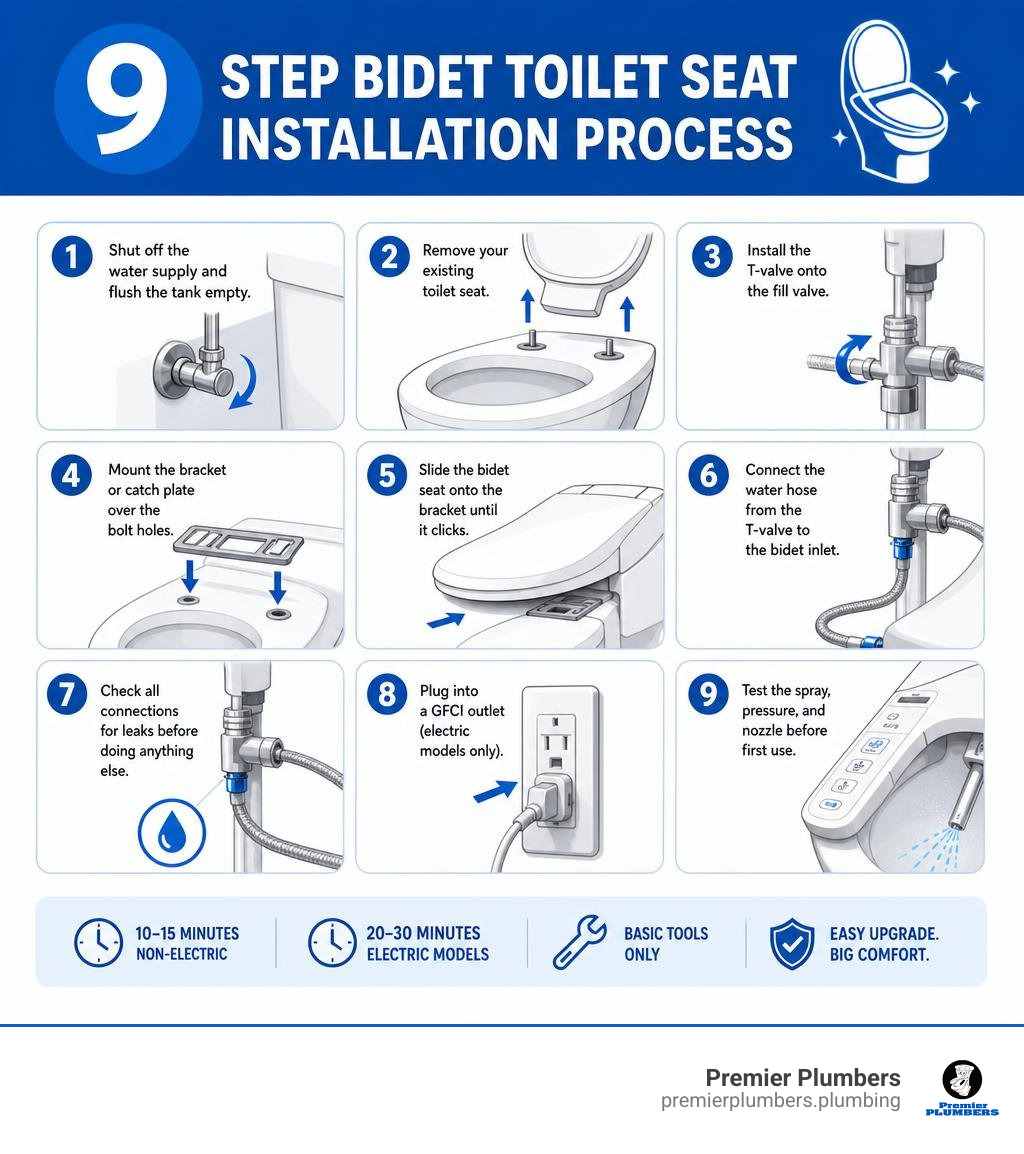
Here’s a quick answer if you just need the overview:
- Shut off the water supply and flush the tank empty.
- Remove your existing toilet seat.
- Install the T-valve onto the toilet’s fill valve.
- Mount the bracket or catch plate over the bolt holes.
- Slide the bidet seat onto the bracket until it clicks.
- Connect the water hose from the T-valve to the bidet inlet.
- Check all connections for leaks before doing anything else.
- Plug into a GFCI outlet (electric models only).
- Test the spray, pressure, and nozzle before first use.
That’s it. Most non-electric bidet attachments take 10 to 15 minutes. Electric bidet seats like the TOTO Washlet or Brondell Swash typically take 20 to 30 minutes. Integrated smart toilets are the exception and do require professional help.
At Premier Plumbers, our team has over 34 years of hands-on plumbing experience across Southwest Florida. We’ve seen how a straightforward bidet toilet seat installation can go sideways fast when homeowners skip key steps like checking for leaks or using the right outlet. This guide walks you through every step so you get it right the first time.
Preparing for Your Bidet Toilet Seat Installation
Before you unbox your shiny new bidet and start tearing apart your bathroom, a little preparation goes a long way. Having the right tools on hand prevents mid-installation panic when water starts dripping onto your clean floor.
Fortunately, the tool list is remarkably short. You will need:
- An adjustable wrench (for loosening stubborn water supply lines)
- A flathead and a Phillips screwdriver (for removing the old toilet seat)
- A clean towel (to catch residual water)
- A small bucket or container
Before diving in, you must understand what your specific bidet model requires. Non-electric bidet attachments and electric bidet seats have very different infrastructure needs. For a deeper understanding of how bathroom upgrades fit into your home’s overall systems, you can read the complete guide to plumbing installation to see how water lines and fixtures interact.
To help you visualize the differences between the two primary bidet types, we have put together this quick comparison table:
| Requirement | Non-Electric Bidet Attachment | Electric Bidet Seat |
|---|---|---|
| Power Source | None (operated by water pressure) | 120V AC Grounded GFCI Outlet |
| Water Temperature | Cold only (unless tapped into sink hot line) | Heated (built-in water heater) |
| Average Install Time | 10 to 15 minutes | 20 to 30 minutes |
| Standard T-Valve Size | 7/8 inch | 7/8 inch |
| Key Features | Basic wash, nozzle cleaning | Heated seat, warm air dryer, deodorizer |
One critical pre-install check is your existing water supply line. If you have a modern, flexible braided metal hose running from the wall shut-off valve to the bottom of your toilet tank, you are in great shape. However, if your home still uses a rigid metal or plastic pipe, you must replace it with a flexible hose before you can install a T-valve.
Step-by-Step Bidet Toilet Seat Installation Guide
Now that your workspace is ready and your tools are laid out, it is time to begin the physical installation. Whether you are upgrading a master bathroom in Sarasota FL, a guest bath in Bradenton FL, or a condo in Naples FL, the fundamental steps remain the same.
Before you start, confirm that the water supply valve turns freely, the toilet has a flexible supply line, and your bidet kit includes the T-valve, mounting bracket, bolts, and bidet hose. If you are installing an electric bidet seat, make sure there is a grounded GFCI outlet close enough for the power cord to reach without an extension cord.
Here is the step-by-step sequence to get your bidet up and running smoothly.
Step 1: Shut Off the Water and Drain the Tank
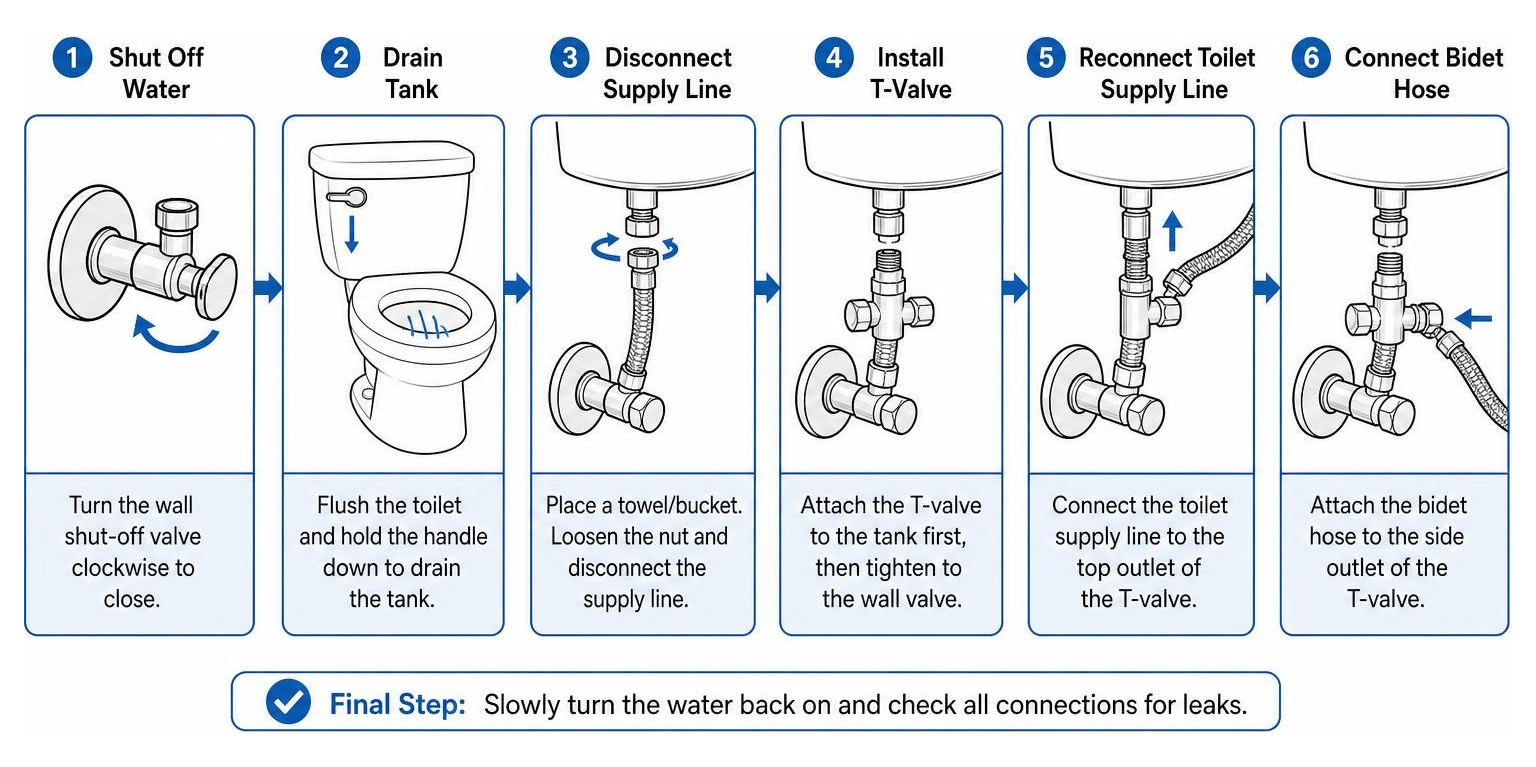
Locate the water shut-off valve on the wall behind your toilet. Turn it clockwise until it stops. If the valve is old and feels stuck, do not force it, as breaking it can cause an immediate home flood. Instead, spray a little penetrating oil, wait 10 minutes, and try again.
Once the valve is closed, flush the toilet and hold the handle down until the tank drains completely. This minimizes the amount of standing water left in the system. Place your towel and small bucket directly under the fill valve connection to catch the residual water that will inevitably drain out when you disconnect the line.
Step 2: Remove the Existing Toilet Seat
Look at the back of your current toilet seat. You will see two plastic covers hiding the mounting bolts. Pop these covers open with a flathead screwdriver.
Reach underneath the toilet bowl to hold the plastic nuts in place while you unscrew the bolts from the top. Once the bolts are out, lift the old seat off. Take this opportunity to thoroughly clean the porcelain rim and the bolt holes, as this area is normally impossible to reach. If you are renting your home, store the old seat and its hardware in a trash bag in your garage or closet so you can reinstall it when you move out.
Step 3: Install the T-Valve
The T-valve (or T-adapter) is the heart of your bidet’s water supply. It splits the incoming fresh water so that it feeds both your toilet tank and your bidet seat.
Unscrew the existing water supply line from the bottom of the toilet tank. Next, screw the T-valve directly onto the threaded fill valve shank sticking out of the bottom of the tank. Make sure the rubber washer is seated flat inside the top of the T-valve before tightening. Hand-tighten the connection first, then use your adjustable wrench to snug it up a quarter-turn past hand-tight.
Step 4: Mount the Bracket or Catch Plate
Electronic bidet seats do not bolt directly to the toilet. Instead, they slide onto a mounting bracket (often called a catch plate) that you must secure to the bowl first.
Place the catch plate over the toilet’s bolt holes. Lay the metal brackets and bolt guides over the plate slots. Insert the mounting bolts through the guides and down through the toilet bowl holes. From the underside of the bowl, slide on the cone packings and thread on the nuts. Leave them slightly loose for now so you can adjust the position of the seat in the next step.
Step 5: Secure the Bidet Seat
Align the bidet seat with the catch plate you just installed. Slide the seat backward into the plate until you hear a satisfying, secure click.
Once the seat is clicked in, adjust its position so that it sits perfectly flush with the front and sides of your toilet bowl. When you are happy with the alignment, carefully slide the bidet seat off (usually by pressing a release button on the side of the unit) and tighten the underside nuts completely to lock the catch plate in place. Slide the bidet seat back on until it clicks again.
Step 6: Connect the Water Hoses
With the seat mounted, it is time to connect the plumbing. Take the flexible bidet hose provided in your installation kit.
Connect one end of the hose to the open side port on your newly installed T-valve. Connect the other end to the water inlet port on the side of the bidet seat. Always start threading these connections by hand. Plastic threads are incredibly easy to cross-thread, which will ruin the fittings and cause permanent leaks. Once hand-tight, give them a gentle snug with your wrench.
Step 7: Check for Leaks
Before you plug in any electronics or try to use the bidet, you must test your plumbing work. Grab a dry piece of toilet paper and slowly turn the wall shut-off valve counterclockwise to restore the water supply.
Watch the connections closely as the toilet tank fills. Wipe each joint with the dry toilet paper. If the paper stays dry, your connections are solid. If you notice a slow drip, try tightening the leaking joint slightly. If a drip persists at a metal-to-metal thread, unscrew the connection, apply a few wraps of plumber’s tape, and reconnect it. Do not use plumber’s tape on connections that rely on rubber washers, as this can actually prevent a proper seal.
Step 8: Connect the Power (For Electric Models)
If you installed an electric bidet seat, you are now ready for power. Uncoil the power cord and plug it directly into a grounded 120V AC GFCI (Ground Fault Circuit Interrupter) outlet.
For safety reasons, never use a standard extension cord in a wet bathroom environment. If you do not have an outlet within four feet of your toilet, you will need to have a licensed electrician install one.
Step 9: Test the Bidet Functions
Never test your bidet by standing over it and pressing buttons, unless you want a face full of cold water! Most electric bidets have a built-in skin sensor in the seat that prevents the nozzle from spraying unless someone is sitting down.
To test the unit safely, place your hand over the seat sensor (usually located on the front left or near the hinge) while holding a clear plastic cup or container over the nozzle area to catch the water. Use your remote control or side panel to activate the rear wash. Verify that the nozzle extends, sprays smoothly, and retracts properly. For electric models, allow three to five minutes for the internal tank to heat up, then test the water and seat temperature settings.
Special Considerations for Unique Toilets
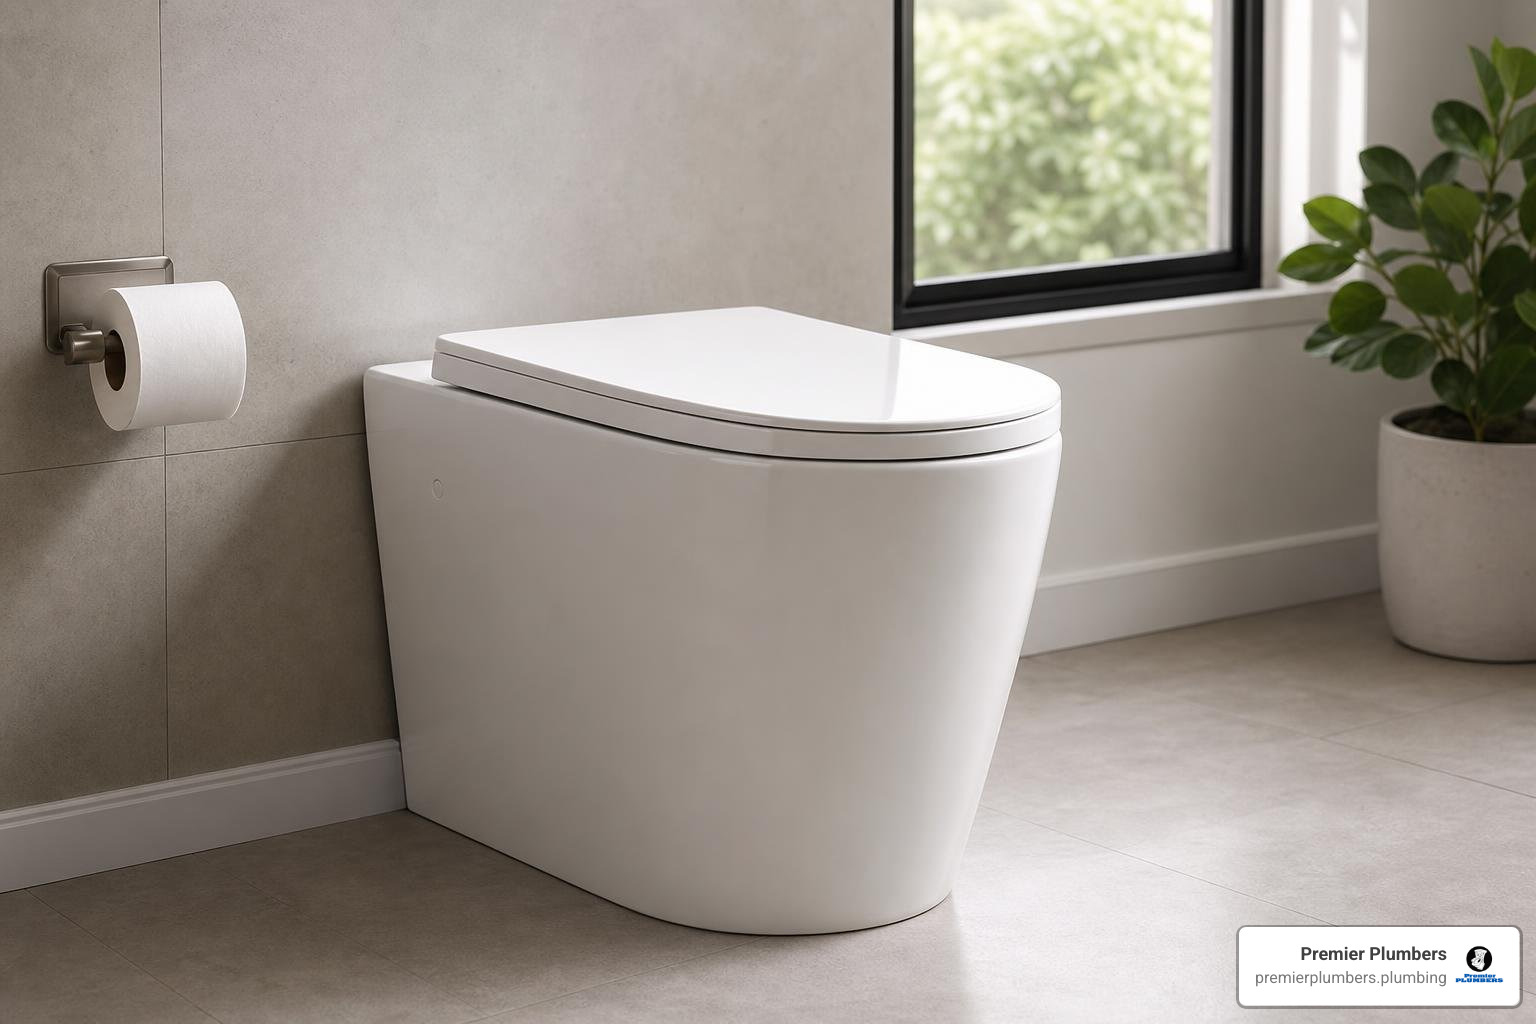
Not every bathroom across Tampa FL, Fort Myers FL, and Cape Coral FL features a standard, two-piece toilet with wide-open plumbing access. Modern design trends have introduced unique toilet styles that require a few adjustments to the standard installation process.
If you run into unexpected structural complications or discover that your home’s shut-off valves are corroded beyond repair, our team at Premier Plumbers is always here to help with professional plumbing repairs to get your bathroom back in working order.
How to handle a bidet toilet seat installation on skirted toilets
Skirted toilets feature smooth, continuous porcelain sides that conceal the trapway. While they look incredibly sleek and are much easier to clean, they present a major challenge for bidet installation: you cannot reach the underside of the bowl to tighten the mounting nuts.
To install a bidet on a skirted toilet, you must use top-mount hardware. Instead of standard bolts and nuts, top-mount systems use rubber expansion sleeves (similar to drywall anchors) that you push into the mounting holes from the top. When you tighten the screw from above, the rubber sleeve expands inside the hole, locking the mounting bracket in place.
Tips for a bidet toilet seat installation with hard water
Florida is famous for its hard water, which is packed with calcium and magnesium minerals. Over time, these minerals will build up inside your bidet’s tiny plastic nozzles, clogging the spray ports and eventually burning out the heating element of an electric seat.
To protect your investment, we highly recommend installing an inline sediment filter between your T-valve and the bidet water hose. These compact filters catch mineral scale and sediment before they can enter your bidet. For the best performance and to keep your bidet spraying like new, replace this inline filter every six months.
If you are also considering replacing your entire toilet during this upgrade, review our comprehensive guide to toilet installation pricing before the FAQ section so you can budget for the full bathroom project.
Frequently Asked Questions about Bidet Installation
Upgrading your bathroom can bring up plenty of practical questions. To help you plan your project, we have compiled answers to the most common questions homeowners ask our team.
Do I need a plumber to install a bidet seat?
For standard two-piece toilets, bidet toilet seat installation is a very DIY-friendly project that does not require professional plumbing skills. However, you should call in a professional plumber if you encounter any of the following situations:
- Your wall shut-off valve is stuck, rusted, or leaking.
- You have a rigid metal water supply line that needs to be cut and replaced.
- You are installing an integrated smart toilet, which requires removing the old toilet, modifying the flange, and running new water lines.
- You do not feel comfortable working around water connections in your home.
How long does a typical bidet installation take?
The time required depends entirely on the type of bidet you choose:
- Non-electric bidet attachments: 10 to 15 minutes.
- Electric bidet seats: 20 to 30 minutes.
- Integrated smart toilets: 2 to 3 hours (and usually requires a professional plumber and electrician).
What should I do if the bidet seat wobbles or leaks?
If your bidet seat wobbles when you sit down, your mounting bolts are likely loose. Slide the seat off the catch plate, tighten the top screws securely, and slide the seat back on.
If you notice a leak at the T-valve, first determine exactly where the water is coming from. If it is dripping from the connection to the toilet tank, check to make sure the rubber washer inside the T-valve did not get twisted or squeezed out of place during installation. If the leak is coming from a metal thread connection, applying a few wraps of plumber’s tape will usually solve the problem.
Conclusion
Upgrading to a bidet is one of the best investments you can make for your home’s comfort, hygiene, and environmental footprint. Once you experience the clean feeling of a heated wash and a warm air dry, you will wonder how you ever got by without one.
If you want to explore different bidet models in person or discuss a complete bathroom refresh, we invite you to visit our plumbing fixtures showroom to see the latest in modern bathroom technology.
At Premier Plumbers, our three-generation legacy of plumbing expertise means we are always ready to help Florida homeowners with clean, professional, and stress-free installations. If you run into tricky plumbing lines, need a new water connection, or simply want a professional to handle the job from start to finish, please contact our professional plumbing installation technicians today to schedule an appointment.